Authors
Articles
Tags
connections

Building a Contact Tracing Platform

Published on
Last edited on

Written by Robert Koch

52 min read
TLDR: I made a contact tracing app that you can access here on vercel.

Introduction

Infrastructure as code is the best way to manage the deployment and maintenance of applications as well as the hardware required to operate them. Writing configurations for applications as code allows for easy, repeatable, and identical deployments across multiple environments. In this article I'm going to describe how to use the AWS Cloud Development Kit (CDK) to create an application and deploy it to an AWS environment.

AWS CDK is an open source framework for defining cloud application resources - including compute, storage, and security resources. It's avaliable in a number of languages including TypeScript, Golang, .Net, and Java. The advantage to using CDK is that you can develop the resources for your application in a language your buisness already uses so developers don't need to learn a new language to deploy and configure an application.

To show how easy it is to create an application with CDK I'g going to make something topical. At the time of writing Melbourne is under it's 6th covid related lockdown, one of the reasons given for the lockdown was that contact tracing personnel were inundated with exposure sites, which needed to be notified, which then needed their staff and customers to be isolated and tested, while their whereabouts traced. This type of problem can be automated, so I figured, why don't I try to build a contact tracing app?

If you want to see the entire project or a particular snippet of the code I've written for this demo you can find it on github.

Architecture

Backend

To start with, here is a basic architecture diagram of what the backend services look like.

Backend Architecture Diagram

The backend architecture for this application is quite simple, the system is based off of a serverless architecture so its cost is proportional to the amount of use it receives. The API which will handle the contact tracing is managed through Amazon AppSync - a managed graphql service. GraphQL is a language and specification for data query and manipulation used most commonly with APIs. Appsync is a great service because it gives front-end developers the ability to query multiple databases, microservices, and APIs with a single endpoint. Since there's only one endpoint it's really easy to update the API in realtime by just adding more data sources. To create an API all you need to do is define a schema and where to fetch the data from and you're mostly done. There are a few more steps if you want to define authentication and more complicated data sources but for the most part it's plug and play.

The checkin data for this applicaiton will be stored in Amazon DynamoDB. There are a few reasons why I chose Dynamo, the first is that it's a fully managed serverless product, so I don't have to worry about managing a database on a server. The second is that it's fast, I mean really fast. A standard query takes about 5ms to complete, that's pretty fast (as we go on I'll talk about how I'm caching a lot of the queries in the Dynamo Accelerator but this didn't speed up my queries for the most part and I'll explain why later). The final reason is that the type of data being used can be easily stored in dynamo as a key value pair. Each checkin looks something like this example.
{
"location_id": "1",
"user_id": "2",
"checkin_datetime": "2021-06-01T00:00:00+10:00"
}
Super nice and simple, and it's really easy to search for a checkin based on the time, user_id, and location_id. DynamoDB queries need a partition key to search upon (a primary key analogue) and can be refined using a sort key, in the application I'm using the user_id and location_id as partition keys while the date will be the sort key. DynamoDB tables support a single partition key, to use multiple partition keys in DynamoDB you need to use a GlobalSecondaryIndex.

Authentication is vital for real world services. Having the ability to verify users who will access sensitive data (checkin data is Personal Identifying Information - PII) is absolutely needed. AppSync supports multiple simultaneous authentication methods - including API keys, IAM user signatures, Amazon Cognito, and external OpenID providers. For this demo I'm going to use Amazon Cognito which is a managed authentication service that can store thousands of user credentials securly in the cloud.

There are two components for the API in the lib directory, the functions directory contains all the API code and the graphql directory contains the schemas.

What is CDK?

The AWS CDK is a framework that can be used to define and organise resources on the AWS cloud. Any project in CDK is setup using "stacks" which are individual deployments that resources are grouped by. In actual fact CDK stacks are synthesized into Amazon CloudFormation templates and deployed using CloudFormation.

CDK is avaliable in a bunch of different languages but for this demo I'm going to use TypeScript to define my CDK stack.

I'm using CDK v2 is this demo because it's pretty close to being released soon. CDK v2 has a bunch of improvements over the first version which you can read about on the aws blog but for this demo it won't matter too much which version you use.

The first thing to do is install the CDK CLI, now if you're using another language like Go or Java the installation will be a bit different but there are instructions for each language on the CDK website.

npm install -g aws-cdk@next

After this you can create a new CDK project in an empty directory based off the app template as shown below.

cdk init app --language typescript

After this you should have a blank CDK project, woo! To verify you should have a directory layout similar to the output below.

ct_app
├── README.md
├── bin
│   └── myapp.ts
├── cdk.json
├── jest.config.js
├── lib
│   └── myapp-stack.ts
├── package-lock.json
├── package.json
├── test
│   └── myapp.test.ts
└── tsconfig.json

Defining the Schema

GraphQL is first and foremost a query language. It's used to describe the data in an API, ask for specific data, and return predicatable results. All queries to a graphql API are sent to one http endpoint which supports POST requests. The data sent in the post request defines the query/mutation and what information to return.

For the graphql engine and clients to understand what queries are valid they require a schema. Th graphql schema is a great tool for defining the scope of the API, it has lots of advantages over traditional http endpoint schemas. The first is that it's self documenting - since the API is defined by the schema it's always exactly what queries the graphql engine is expecting. Secondly, any graphql inspector like GraphiQL can automatically read the schema and lint your requests as you write them (once you set up authentication with the server). Lastly since graphql is a strictly typed language all the requests defined in the schema have types that can be used, expanded, and checked against - meaning it's very hard to send an incorrect query.
For this project there are two query files, the first is the scalars.graphql file. This is used for linting purposes during development, the graphql specification defines a few specific data types that all engines must support (things like String and Float) but any engine implementation can have extra built-in types, in fact you can specify your own in the schema. AppSync has several built in types that we're going to use so, to help tools like vscode and intellij understand these new types we can define another schema file that is in the same directory as our main schema that won't get used by the CDK stack but will be used by any tools that scan the directory.
For a complete list of AppSync built-in scalar types you can check out the documentation on the site.
1# scalars.graphql
2
3scalar AWSTimestamp
4scalar AWSURL
5scalar AWSDate
6scalar AWSDateTime
7
8directive @aws_api_key on FIELD_DEFINITION | INPUT_OBJECT | OBJECT | ENUM
9directive @aws_cognito_user_pools on FIELD_DEFINITION | INPUT_OBJECT | OBJECT | ENUM_VALUE
1# schema.graphql
2
3type CheckIn {
4 location_id: String
5 user_id: String
6 checkin_datetime: AWSDateTime
7}
8
9type Output {
10 items: [CheckIn]
11 nextToken: String
12}
13
14type LocationFlat {
15 location_id: String
16 latitude: String
17 longitude: String
18}
19
20type Node {
21 user_id: String
22}
23
24type Link {
25 source: String
26 target: String
27 time: String
28 location_id: String
29 latitude: String
30 longitude: String
31}
32
33type Flat {
34 nodes: [Node]
35 links: [Link]
36 locations: [LocationFlat]
37}
38
39type Query {
40 get_user_location_history(
41 user_id: String!
42 from: AWSDateTime
43 until: AWSDateTime
44 nextToken: String
45 limit: Int
46 ): Output
47 get_location_attendees(
48 location_id: String!
49 from: AWSDateTime
50 until: AWSDateTime
51 nextToken: String
52 limit: Int
53 ): Output
54 trace_exposure_flat(
55 user_id: String!
56 from: AWSDateTime
57 until: AWSDateTime
58 ): Flat
59}
60
61type Mutation {
62 check_in(location_id: String!, user_id: String!): CheckIn
63}
64
65type Schema {
66 query: Query
67 mutation: Mutation
68}

Writing the Functions

The backbone of an AppSync API are the data sources. The data sources map to a query or mutation object and tell AppSync where to get or set the data for the operation. At the time of writing there are 6 different data sources: DynamoDB, Elasticsearch, Lambda, RDS, HTTP, and None (this is just an empty placeholder).

This API uses two different data sources. For simple key retrivals the API has a DynamoDB resolver, this data source can query the table directly using a mapping template and return the results. There are a few advantages to doing this, the main one is that you don't need to write an extra lambda function in another language to query the database.

The other resolver used is the lambda provider. AppSync can use Amazon Lambda functions as a data source provider, using lambda to run functions allows your API to run any arbitary code needed to get a result for the API. Also since lambda functions can now run docker images there isn't really any function that your API can't do.

To set up a go project inside the CDK the only step you need to complete is creating a go manifest file using go mod.
go mod init github.com/kochie/contact-tracing/lib/functions

The manifest file is used by the Go toolchain to track and download dependencies for a program, it's also used in the build steps to validate the structure and version of Go the program is compatible with. After making the manifest file you can create a Go file in any sub-directory which is a great way to organise the code your going to write. Below is an example of how I've laid out the structure of the contact tracing API functions.

functions
├── common
│   └── utilities.go
├── contact_trace_flat
│   └── main.go
├── go.mod
├── go.sum
└── trace_exposure_over_time
└── main.go

A Quick Note on CDK V2 and Golang Lambda Functions

At the time of writing this article one of the major flaws in CDK v2 is that there is no support for using languages other than JavaScript to write lambda functions with and have them automatically bundled and deployed with the stack. For the first version of CDK Rafal Wilinski wrote a custom construct that will compile Golang lambda functions and bundle them with the stack however, this construct doesn't work with v2 of the CDK. So to fix this I spent the better part of a weekend a few weeks ago patching the code Rafal wrote and making a version that is compatible with v2 of the CDK which you can find on GitHub.

Common

A lot of the code to access the Dynamo table across functions is identical, so I've refactored this code into it's own seperate file. The utilities.go file has two public methods: GetLocationVisitors and GetUserLocationHistory. In the snippet below I've only added the code required for GetLocationVisitors as an example of how to build a function that can access Dynamo.
1// utilities.go
2// NOTE: This is just an snippet of the entire file, to see the entire source goto
3// https://github.com/kochie/contact-tracing/blob/master/lib/functions/common/utilities.go
4package common
5
6import (
7 "context"
8 "log"
9 "os"
10 "time"
11
12 "github.com/aws/aws-dax-go/dax"
13 "github.com/aws/aws-sdk-go-v2/aws"
14 "github.com/aws/aws-sdk-go-v2/config"
15 "github.com/aws/aws-sdk-go-v2/feature/dynamodb/attributevalue"
16 "github.com/aws/aws-sdk-go-v2/service/dynamodb"
17 "github.com/aws/aws-sdk-go-v2/service/dynamodb/types"
18 "github.com/aws/aws-xray-sdk-go/xray"
19)
20
21var client *dax.Dax
22
23var tableName = os.Getenv("TABLE_NAME")
24
25type CheckIn struct {
26 UserID string `dynamodbav:"user_id"`
27 LocationID string `dynamodbav:"location_id"`
28 CheckinDatetime time.Time `dynamodbav:"checkin_datetime"`
29 Latitude string `dynamodbav:"latitude"`
30 Longitude string `dynamodbav:"longitude"`
31}
32
33func init() {
34 daxEndpoint := os.Getenv("DAX_ENDPOINT")
35
36 cfg, err := config.LoadDefaultConfig(context.TODO())
37 if err != nil {
38 log.Fatal(err)
39 }
40
41 err = xray.Configure(xray.Config{
42 ServiceVersion: "1.2.3",
43 })
44
45 if err != nil {
46 log.Fatal(err)
47 }
48
49 xray.AppendMiddlewares(&cfg.APIOptions)
50 log.Println("Xray middleware applied")
51
52 daxCfg := dax.DefaultConfig()
53 daxCfg.HostPorts = []string{daxEndpoint}
54 daxCfg.Region = "ap-southeast-2"
55 daxCfg.RequestTimeout = 5 * time.Minute
56 client, err = dax.New(daxCfg)
57 if err != nil {
58 log.Fatal(err)
59 }
60 log.Println("Dynamo Accelerator configured")
61 log.Println("Ready to work.")
62}
63
64func GetLocationVisitors(locationId, from, until string, ctx context.Context) ([]*CheckIn, error) {
65 var expression string
66 expressionAttributeValues := map[string]types.AttributeValue{
67 ":location_id": &types.AttributeValueMemberS{Value: locationId},
68 }
69
70 if from != "" && until != "" {
71 expression = `location_id = :location_id AND checkin_datetime BETWEEN :from AND :until`
72 expressionAttributeValues[":from"] = &types.AttributeValueMemberS{Value: from}
73 expressionAttributeValues[":until"] = &types.AttributeValueMemberS{Value: until}
74 } else if until != "" {
75 expression = `location_id = :location_id AND checkin_datetime <= :until`
76 expressionAttributeValues[":until"] = &types.AttributeValueMemberS{Value: until}
77 } else if from != "" {
78 expression = `location_id = :location_id AND checkin_datetime >= :from`
79 expressionAttributeValues[":from"] = &types.AttributeValueMemberS{Value: from}
80 } else {
81 expression = `location_id = :location_id`
82 }
83
84 paginator := dynamodb.NewQueryPaginator(client, &dynamodb.QueryInput{
85 TableName: aws.String(tableName),
86 KeyConditionExpression: aws.String(expression),
87 ExpressionAttributeValues: expressionAttributeValues,
88 })
89
90 locations := make([]*CheckIn, 0)
91 for paginator.HasMorePages() {
92 resp, err := paginator.NextPage(ctx)
93
94 if err != nil {
95 return nil, err
96 }
97
98 for _, item := range resp.Items {
99 checkin := CheckIn{}
100 err := attributevalue.UnmarshalMap(item, &checkin)
101 if err != nil {
102 return nil, err
103 }
104
105 locations = append(locations, &checkin)
106 }
107 }
108
109 return locations, nil
110}
There are a few components from the above code I'd like the highlight before moving on. The first is that the CheckIn struct is using dynamodbav tags to define the relationship between struct properties and DynamoDB properties. Tags are using ing Golang to provide additional context to properties in structs, they're most commonly used for (un)marshalling JSON and XML data with structs without the need for custom code to handle the process.
The second point is the code around dax. In this app I'm using DynamoDB Accelerator (DAX) to cache the results of queries and speed up the API response time. I'll go into more details about setting up and configuring DAX later but for the time being wherever you see DAX code in the API you should know that you can also use DynamoDB clients as well.
The final point to mention revolves around the pagination of results received from DynamoDB. Any query that is made to DynamoDB will return a maximum of 1MB per transaction, to collect all the results from a query you need to use the paginator object. The NewQueryPaginator will handle the work of collecting multiple pages of data and is a drop in replacement for the standard Query method.

Trace Exposure Function

With the Dynamo table access seperated into a different file the contact tracing code can import the calls when needed using the import statement. The structure of the code is fairly strightforward so I won't go into too much detail; the flowchart below describes how the algorithm works.
Control Flow of Flat Contact Tracing
1// contact_trace_flat.go
2
3package main
4
5import (
6 "context"
7 "time"
8
9 "github.com/aws/aws-lambda-go/lambda"
10 "github.com/kochie/contact-tracing/lib/functions/common"
11)
12
13type User struct {
14 UserId string `json:"user_id"`
15 From string `json:"-"`
16 Contacts []*Location `json:"contacts"`
17}
18
19type Location struct {
20 Time time.Time `json:"time"`
21 LocationId string `json:"location_id"`
22 Visitors []*User `json:"visitors"`
23}
24
25func HandleRequest(ctx context.Context, event interface{}) (*User, error) {
26 eventData := event.(map[string]interface{})
27 arguments := eventData["arguments"].(map[string]interface{})
28 userId := arguments["user_id"].(string)
29 from := ""
30 if _, ok := arguments["from"].(string); ok {
31 from = arguments["from"].(string)
32 }
33 until := ""
34 if _, ok := arguments["until"].(string); ok {
35 until = arguments["until"].(string)
36 }
37
38 seenUsers := make(map[string]bool)
39 seenLocations := make(map[string]bool)
40
41 rootUser := User{UserId: userId, From: from, Contacts: make([]*Location, 0)}
42 stack := []*User{&rootUser}
43
44 for len(stack) > 0 {
45 user := stack[0]
46 from = user.From
47 stack = stack[1:]
48
49 if _, ok := seenUsers[user.UserId]; ok {
50 continue
51 }
52
53 seenUsers[user.UserId] = true
54 checkins, err := common.GetUserLocationHistory(user.UserId, from, until, ctx)
55 if err != nil {
56 return nil, err
57 }
58 for _, checkin := range checkins {
59 locationID := checkin.LocationID
60 if _, ok := seenLocations[locationID]; ok {
61 continue
62 }
63 seenLocations[locationID] = true
64
65 f := checkin.CheckinDatetime.Add(-time.Hour).Format(time.RFC3339)
66 u := checkin.CheckinDatetime.Add(time.Hour).Format(time.RFC3339)
67 visitors, err := common.GetLocationVisitors(locationID, f, u, ctx)
68 if err != nil {
69 return nil, err
70 }
71
72 users := make([]*User, 0)
73 for _, visitor := range visitors {
74 if _, ok := seenUsers[visitor.UserID]; ok {
75 continue
76 }
77
78 u := User{visitor.UserID, checkin.CheckinDatetime.Format(time.RFC3339), make([]*Location, 0)}
79 stack = append(stack, &u)
80 users = append(users, &u)
81 }
82
83 user.Contacts = append(user.Contacts, &Location{
84 checkin.CheckinDatetime,
85 locationID,
86 users,
87 })
88 }
89 }
90
91 return &rootUser, nil
92}
93
94func main() {
95 lambda.Start(HandleRequest)
96}
At this point I'd like to mention that the Lambda resolver that I've setup is known more specifically as a Direct Lambda Resolver. The distinction is because when using a Lambda resolver you can optionally include a mapping template that can transform the API input before the Lambda sees it. To understand more about how Direct Lambda Resolvers work you can read this blog about them. Because there is no mapping template for the function you need to take extra care in parsing and validating the input to the function. Becuase Lambda doesn't have any information around how the input event is structured it is defined using an empty interface - which is the Go analogue of an any object. Because of this you have to test and type assert any object that should be inside the input.

Building the Stack

Now that the function code has been defined we can move onto building the stack definiton. Inside of the lib directory there should be a file similar to contact-tracing-stack.ts this file contains the stack and resources that will be added to the app. Inside the file there should be a single class which will be the stack definiton.
1export class ContactTracingStack extends Stack {
2 constructor(scope: Construct, id: string, props?: StackProps) {
3 super(scope, id, props)
4
5 // Define resources here
6 }
7}
From here all the resources will be defined within the scope of the class constructor1.

VPC

Virtual Private Clouds (VPCs) are an abstraction that lets you logically isolate a virtual network. It's best practice to assign lambdas to a VPC and as we'll see in Using Dynamo DAX it's required to set up a DAX server. VPCs are split into subnets which can be connected to the internet (private vs public) and given unique names and subnet masks.
1const vpc = new ec2.Vpc(this, 'contacts-vpc', {
2 cidr: Vpc.DEFAULT_CIDR_RANGE,
3 subnetConfiguration: [
4 {
5 cidrMask: 24,
6 name: 'default',
7 subnetType: ec2.SubnetType.PUBLIC,
8 },
9 {
10 cidrMask: 24,
11 name: 'contact-tracing',
12 subnetType: ec2.SubnetType.PRIVATE,
13 },
14 ],
15})

DynamoDB Table

There are two resources that need to be created for the Dynamo database. The first is the table itself, and the second is a global secondary index. The Dynamo table will allow querying using a single partition key and optional sort key for this table; the location ID will be the partition key and the check in date will be the sort key. This will mean that queries the table based by location will be trivial, but it won't be possible to run a query based on the user. The way to solve this using Dynamo is to create another index. There are two types of secondary indexes in Dynamo, Global Secondary Indexes allow for another partition key while Local Secondary Indexes provide another sort key. Since we're going to be searching for a user and sorting the results based on the check in date we only need a Global Secondary Index.

1const contact_table = new dynamo.Table(this, 'contact-tracing-table', {
2 tableName: 'checkins',
3 encryption: dynamo.TableEncryption.AWS_MANAGED,
4 partitionKey: {
5 name: 'location_id',
6 type: dynamo.AttributeType.STRING,
7 },
8 sortKey: {
9 name: 'checkin_datetime',
10 type: dynamo.AttributeType.STRING,
11 },
12 billingMode: BillingMode.PAY_PER_REQUEST,
13})
14
15contact_table.addGlobalSecondaryIndex({
16 indexName: 'index_by_user',
17 partitionKey: {
18 name: 'user_id',
19 type: dynamo.AttributeType.STRING,
20 },
21 sortKey: {
22 name: 'checkin_datetime',
23 type: dynamo.AttributeType.STRING,
24 },
25})

Using Dynamo Dax

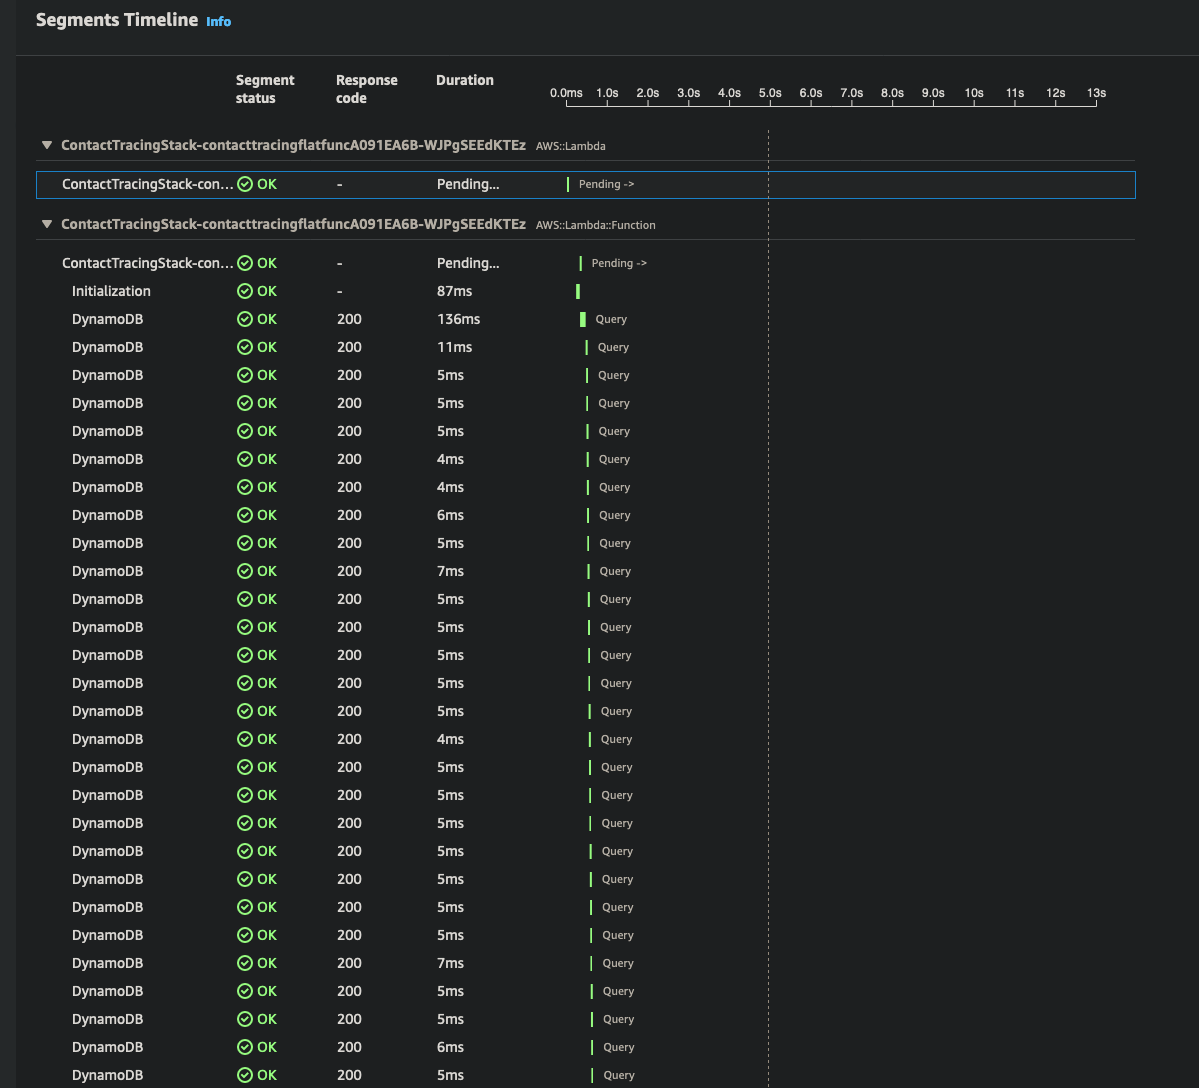
Over the course of this project I found that some of the larger requests were taking up to 16 seconds to run. In terms of making a responsive website that's incredibly slow. As I investigated the issue I found that over 99% of the execution time was being used witing for DynamoDB queries. Now like I said at the top of this article Dynamo is really fast, queries usually take less than 5ms to run, but when you're creating a contact tracer that has to cross reference thousands, potentially millions of people and locations those 5ms add up. You can see the latency in, each segment represents a query operation; as you can see the number of queries rapidly increases.

XRay Timeline of an API call

To speed up these request I decided to use DynamoDB Accellerator (DAX) to cache the results of any Dynamo queries. DAX is an in-memory cache that can deliver up to a 10 times performance improvement for DynamoDB queries. It does this by creating a cluster in your VPC that can communicate with any application connected in that VPC. DAX is a drop in replacement for DynamoDB - meaning that if you write code to work with DynamoDB all you need to do is replace the DynamoDB client with the DAX client and it will work right away, there's no need to change any of the application logic to support DAX API calls.

DAX Architecture
DAX Architecture

My intial thought was that most of the queries that would be executed would be repeats of previous queries - this assumption however, was wrong.

<Rant>
So as I'll mention earlier in the article I'm using Golang to write the lambda functions, to use the AWS API in Golang you should use the offical SDKs. The latest version of the SDK aws-sdk-v2 has been in active public development for a few years and was classified generally avaliable in January of thos year.
Now the new SDK has a bunch of useful features that make it much easier to use which I've mentioned in the highlights (you can find a full list of improvements on the SDK website), but for the time being I wrote most of the function code before adding support for DAX.
Now the new SDK does not have out of the box support for DAX, due to the architecture of how DAX works it would require a major rewrite2. The original SDK doesn't have support either, but there is another SDK built for DAX that has support for v1 of the Golang SDK.

Now here in lies the problem, because v2 of the Golang SDK is a complete rewrite, this library is incompatible with the new SDK version. Now you'd think that there would be support for the new SDK considering both of these repos are official AWS repositories but alas.

So I took it upon myself to try to add support for the new version which you can see on GitHub. So great sounds like problem solved right? Well no because the DAX protocol is pretty confusing, to get the speed they're promising the DAX team isn't using HTTP to talk to the DAX cluster, they're rolling their own custom protocol using TCP. So all I've done is change the input and output structs of the DAX SDK to support the structs from v2 of the AWS Golang SDK. Is this an eligant solution? No. Is this a good solution? eh. But it is a solution.
</Rant>
So anyway if you want to use DAX with this application (or any other aws-sdk-v2 code) you need to add this snippet to the bottom of your go.mod file to let the toolkit know that you want to use a fork of the original repository.
replace (
github.com/aws/aws-dax-go => github.com/kochie/aws-dax-go master
)

After all this work I tested the API calls and success! Kind of; well the first request is still slow but any identical subsequent requests are much faster (less than 1ms). The only problem with this is that most of the requests are not going to be identical so the speedup isn't really worth the effort. I've documented what I've done for the sake of completeness but I don't recommend using DAX for a problem like this.

1const daxRole = new iam.Role(this, 'dax-role', {
2 assumedBy: new iam.ServicePrincipal('dax.amazonaws.com'),
3 inlinePolicies: {
4 dynamo_access: new iam.PolicyDocument({
5 statements: [
6 new iam.PolicyStatement({
7 actions: ['dynamodb:*'],
8 effect: iam.Effect.ALLOW,
9 resources: [
10 contact_table.tableArn,
11 `${contact_table.tableArn}/index/index_by_user`,
12 ],
13 }),
14 ],
15 }),
16 },
17})
18
19const securityGroup = new ec2.SecurityGroup(this, 'security-group-vpc', {
20 vpc,
21})
22securityGroup.addIngressRule(ec2.Peer.anyIpv4(), ec2.Port.tcp(8111), 'DAX')
23
24const daxSubnetGroup = new dax.CfnSubnetGroup(this, 'dax-subnet-group', {
25 subnetGroupName: 'contact-tracing',
26 subnetIds: vpc.privateSubnets.map((subnet) => subnet.subnetId),
27})
28
29const cache = new dax.CfnCluster(this, 'dax-contacts', {
30 clusterName: 'contacts',
31 description: 'DAX cache for contact tracing',
32 iamRoleArn: daxRole.roleArn,
33 nodeType: 'dax.t3.small',
34 replicationFactor: 1,
35 securityGroupIds: [securityGroup.securityGroupId],
36 sseSpecification: {
37 sseEnabled: true,
38 },
39 subnetGroupName: daxSubnetGroup.subnetGroupName,
40})
41cache.addDependsOn(daxSubnetGroup)

Cognito User Pool and Client

Next to set up Cognito; there are two resources that need to be created. The first is the Cognito User Pool, this resouce will hold all the information about users who aceess the API - mainly their email and password. The second component is the Cognito App Client, this resource is used as an endpoint for web services to talk to Cognito, it specifies what authentication methods are valid.

1const user_pool = new cognito.UserPool(this, 'ct-user-pool', {
2 userPoolName: 'contact-tracing-pool',
3 signInCaseSensitive: false,
4 selfSignUpEnabled: true,
5 signInAliases: {
6 email: true,
7 },
8 autoVerify: {
9 email: true,
10 },
11 standardAttributes: {
12 email: { required: true },
13 },
14 passwordPolicy: {
15 requireSymbols: false,
16 requireDigits: false,
17 requireLowercase: false,
18 requireUppercase: false,
19 },
20})
21
22const user_pool_client = new cognito.UserPoolClient(
23 this,
24 'ct-user-pool-client',
25 {
26 userPool: user_pool,
27 userPoolClientName: 'contact-tracing-client',
28 }
29)

AppSync API Schema

Now with the dependencies out of the way we can now create the AppSync API. The first part is to define a new AppSync API resource and the schema the resource will use.

1const api = new appsync.CfnGraphQLApi(this, 'ct-api', {
2 authenticationType: 'AMAZON_COGNITO_USER_POOLS',
3 name: 'contact-tracing-api',
4 userPoolConfig: {
5 userPoolId: user_pool.userPoolId,
6 awsRegion: this.region,
7 defaultAction: 'ALLOW',
8 },
9 logConfig: {
10 // This arn is premade if you already have an appsync api.
11 // If it's not there you can make it using CloudWatch.
12 cloudWatchLogsRoleArn:
13 'arn:aws:iam::457234467265:role/service-role/appsync-graphqlapi-logs-ap-southeast-2',
14 excludeVerboseContent: false,
15 fieldLogLevel: 'ALL',
16 },
17})
18
19const api_schema = new appsync.CfnGraphQLSchema(this, 'ct-api-schema', {
20 apiId: api.attrApiId,
21 definition: readFileSync(
22 join(__dirname, 'graphql/schema.graphql')
23 ).toString(),
24})

This will create an AppSync API that will use the attached schema we created before. But at the moment none of the data values in the schema are connected to a resolver. To do this we'll need to create some data sources and resolvers.

AppSync Data Sources and Resolvers

The Data Sources and Resolvers are a critical piece of the API infrastructure, they connect AppSync to all the storage and compute resources behind your API so making sure they're correctly defined is crucial.

The first Data Source we're going to make is for a direct DynamoDB connection. To make this we're going to give AppSync full access to our DynamoDB to read and write to our table. We're then going to point AppSync to the DynamoDB table we created before.

1const table_role = new iam.Role(this, 'ItemsDynamoDBRole', {
2 assumedBy: new iam.ServicePrincipal('appsync.amazonaws.com'),
3})
4table_role.addManagedPolicy(
5 iam.ManagedPolicy.fromAwsManagedPolicyName('AmazonDynamoDBFullAccess')
6)
7
8const dataSource = new appsync.CfnDataSource(this, 'ItemsDataSource', {
9 apiId: api.attrApiId,
10 name: 'ItemsDynamoDataSource',
11 type: 'AMAZON_DYNAMODB',
12 dynamoDbConfig: {
13 tableName: contact_table.tableName,
14 awsRegion: this.region,
15 },
16 serviceRoleArn: table_role.roleArn,
17})
Now we need to make a resolver for our Data Source. This resolver will be linked to the get_user_location_history and get_location_attendees API queries which will be used by the API to get results for specifics users and locations on the pages https://ct.vercel.app/location and https://ct.vercel.app. Direct DynamoDB resolvers are useful when you don't need to use much buisness logic to return API data. The resolver only needs a mapping template that can convert the input into a DynamoDB transaction. The result is then converted into a JSON compatible string and returned to AppSync.
1const getUserLocationHistoryResolver = new appsync.CfnResolver(
2 this,
3 'getUserLocationHistoryQueryResolver',
4 {
5 apiId: api.attrApiId,
6 typeName: 'Query',
7 fieldName: 'get_user_location_history',
8 dataSourceName: dataSource.name,
9 requestMappingTemplate: `{
10 "version": "2018-05-29",
11 "operation": "Query",
12 "query": {
13 "expression": "user_id = :userId \
14 #if( $ctx.args.from && $ctx.args.until )
15 AND checkin_datetime BETWEEN :from AND :until",
16 #elseif( $ctx.args.from )
17 AND checkin_datetime >= :from",
18 #elseif( $ctx.args.until )
19 AND checkin_datetime <= :until",
20 #else
21 ",
22 #end
23 "expressionValues": {
24 ":userId": $util.dynamodb.toDynamoDBJson($ctx.args.user_id),
25 #if( $ctx.args.from )
26 ":from": $util.dynamodb.toDynamoDBJson($ctx.args.from),
27 #end
28 #if( $ctx.args.until )
29 ":until": $util.dynamodb.toDynamoDBJson($ctx.args.until),
30 #end
31 }
32 },
33 "index": "index_by_user",
34 "limit": $util.defaultIfNull($ctx.args.limit, 20),
35 "nextToken": $util.toJson($util.defaultIfNullOrBlank($ctx.args.nextToken, null))
36 }`,
37 responseMappingTemplate: `{
38 "items": $util.toJson($ctx.result.items),
39 "nextToken": $util.toJson($util.defaultIfNullOrBlank($ctx.result.nextToken, null))
40 }`,
41 }
42)
43
44getUserLocationHistoryResolver.addDependsOn(api_schema)
45const getLocationAttendeesResolver = new appsync.CfnResolver(
46 this,
47 'getLocationAttendeesQueryResolver',
48 {
49 apiId: api.attrApiId,
50 typeName: 'Query',
51 fieldName: 'get_location_attendees',
52 dataSourceName: dataSource.name,
53 requestMappingTemplate: `{
54 "version": "2018-05-29",
55 "operation": "Query",
56 "query": {
57 "expression": "location_id = :locationId \
58 #if( $ctx.args.from && $ctx.args.until )
59 AND checkin_datetime BETWEEN :from AND :until",
60 #elseif( $ctx.args.from )
61 AND checkin_datetime >= :from",
62 #elseif( $ctx.args.until )
63 AND checkin_datetime <= :until",
64 #else
65 ",
66 #end
67 "expressionValues": {
68 ":locationId": $util.dynamodb.toDynamoDBJson($ctx.args.location_id),
69 #if( $ctx.args.from )
70 ":from": $util.dynamodb.toDynamoDBJson($ctx.args.from),
71 #end
72 #if( $ctx.args.until )
73 ":until": $util.dynamodb.toDynamoDBJson($ctx.args.until),
74 #end
75 }
76 },
77 "limit": $util.defaultIfNull($ctx.args.limit, 20),
78 "nextToken": $util.toJson($util.defaultIfNullOrBlank($ctx.args.nextToken, null))
79 }`,
80 responseMappingTemplate: `{
81 "items": $util.toJson($ctx.result.items),
82 "nextToken": $util.toJson($util.defaultIfNullOrBlank($ctx.result.nextToken, null))
83 }`,
84 }
85)
86getLocationAttendeesResolver.addDependsOn(api_schema)
The mapping template is written in a language called Apache Velocity, you can find out more in the AWS documentatoin including a list of helper functions for working with DynamoDB.
We're also going to use this data source to put new check ins into the table. The process is exactly the same as a the above query but instead we'll use the PutItem operation.
1const checkinResolver = new appsync.CfnResolver(
2 this,
3 'checkinMutationResolver',
4 {
5 apiId: api.attrApiId,
6 typeName: 'Mutation',
7 fieldName: 'check_in',
8 dataSourceName: dataSource.name,
9 requestMappingTemplate: `{
10 "version": "2018-05-29",
11 "operation": "PutItem",
12 "key": {
13 "location_id": $util.dynamodb.toDynamoDBJson($ctx.args.location_id),
14 "checkin_datetime": $util.dynamodb.toDynamoDBJson($util.time.nowISO8601())
15 },
16 "attributeValues": {
17 "user_id": $util.dynamodb.toDynamoDBJson($ctx.args.user_id)
18 }
19 }`,
20 responseMappingTemplate: `$util.toJson($ctx.result)`,
21 }
22)
23checkinResolver.addDependsOn(api_schema)
That's it. Now the get_user_location_history, get_location_attendees, and check_in are connected to a data source. The final call we'll look at is trace_exposure_flat. First we're going to create a Golang function using the plugin that I mentioned in A Quick Note on CDK V2 and Golang Lambda Functions and we're going to set some environment variable from resources we've already created and create some security policies to grant access to resources.
1const contactTracingFlatFunc = new GolangFunction(
2 this,
3 'contact-tracing-flat-func',
4 {
5 entry: 'lib/functions/contact_trace_flat/main.go',
6 vpc: vpc, // created in the DynamoDB DAX section
7 vpcSubnets: {
8 subnetType: ec2.SubnetType.PRIVATE,
9 },
10 securityGroups: [securityGroup], // also created in the DAX section
11 environment: {
12 TABLE_NAME: contact_table.tableName,
13 DAX_ENDPOINT: cache.attrClusterDiscoveryEndpoint,
14 },
15 timeout: Duration.minutes(15),
16 memorySize: 1024,
17 initialPolicy: [
18 new iam.PolicyStatement({
19 actions: ['dynamodb:Query'],
20 effect: iam.Effect.ALLOW,
21 resources: [
22 contact_table.tableArn,
23 `${contact_table.tableArn}/index/index_by_user`,
24 ],
25 }),
26 new iam.PolicyStatement({
27 actions: ['dax:*'],
28 effect: iam.Effect.ALLOW,
29 resources: ['*'],
30 }),
31 ],
32 }
33)

Next we're going to create a service role that AppSync can use to invoke the Lambda function, as well as create a Lambda Data Source.

1const lambda_role = new iam.Role(this, 'LambdaRole', {
2 assumedBy: new iam.ServicePrincipal('appsync.amazonaws.com'),
3 inlinePolicies: {
4 lambda_access: new iam.PolicyDocument({
5 statements: [
6 new iam.PolicyStatement({
7 actions: ['lambda:InvokeFunction'],
8 effect: iam.Effect.ALLOW,
9 resources: [contactTracingFlatFunc.functionArn],
10 }),
11 ],
12 }),
13 },
14})
15
16const traceExposureFlatLambdaDataSource = new appsync.CfnDataSource(
17 this,
18 'traceExposureFlatLambdaDataSource',
19 {
20 apiId: api.attrApiId,
21 name: 'TraceExposureFlatDataSource',
22 type: 'AWS_LAMBDA',
23 lambdaConfig: {
24 lambdaFunctionArn: contactTracingFlatFunc.functionArn,
25 },
26 serviceRoleArn: lambda_role.roleArn,
27 }
28)
29traceExposureFlatLambdaDataSource.addDependsOn(api_schema)

After we've created a data source we're going to connect it to a resolver like we did before.

1const traceExposureFlatQueryResolver = new appsync.CfnResolver(
2 this,
3 'traceExposureFlatQueryResolver',
4 {
5 apiId: api.attrApiId,
6 typeName: 'Query',
7 fieldName: 'trace_exposure_flat',
8 dataSourceName: traceExposureFlatLambdaDataSource.name,
9 }
10)
11traceExposureFlatQueryResolver.addDependsOn(traceExposureFlatLambdaDataSource)

There you have it, now the lambda function we wrote before is connected to AppSync and can be used for API calls. All that's left to do is deploy the stack.

Deploying with CDK

Deploying with CDK is easy to do, there is a single command that will generate the CloudFormation template and deploy it to the configured environment.

cdk deploy

One thing to mention here - A useful feature of CDK is the ability to use CloudFormation Outputs to print attributes that are useful. For example the API URL, Userpool Id, and AppClient Id are all values needed by the frontend which can be hard coded into the environment.

1new CfnOutput(this, 'api-url', {
2 value: api.attrGraphQlUrl,
3})
4
5new CfnOutput(this, 'userpool-id', {
6 value: user_pool.userPoolId,
7})
8
9new CfnOutput(this, 'userpool-appclient-id', {
10 value: user_pool_client.userPoolClientId,
11})
✅ ContactTracingStack
Outputs:
ContactTracingStack.apiurl = https://epmecp3h7naxbhpwebqxvdu2sq.appsync-api.ap-southeast-2.amazonaws.com/graphql
ContactTracingStack.userpoolappclientid = 6o5j6tu3veq99u6dqh187ut2dj
ContactTracingStack.userpoolid = ap-southeast-2_R3TWUkG9u

Frontend

The frontend of the application is a React site using next.js. Next is a great framework for developing websites using React and can be hosted on any static web service. For this application I'm using vercel.com as it's a free service that works really well with next since they're both made by the same team. I do want to point out that Amazon Amplify has great support for NextJS as well but I'm using vercel as my preferred choice.
The first step is to create a next app, this can be done with the create-next-app tool which is pretty similar to create-react-app if you're farmiliar with that.
npx create-next-app frontend/

After running the setup command you should have a directory something like this.

frontend
├── README.md
├── package-lock.json
├── package.json
├── pages
│   ├── _app.js
│   ├── api
│   │   └── hello.js
│   └── index.js
├── public
│   ├── favicon.ico
│   └── vercel.svg
└── styles
├── Home.module.css
└── globals.css
We now have a boilerplate NextJS project, running npm run dev will start up the development server and you should see a starting page. We're not going to be using this page or the API setup by next so you can delete the pages/ directory. We're going to make two files in the src/pages directory - _app.tsx and index.tsx. They should look something like this.
1// src/pages/_app.tsx
2
3import type { AppProps } from 'next/app'
4
5function App({ Component, pageProps }: AppProps) {
6 return <Component {...pageProps} />
7}
8
9export default App
1// src/pages/index.tsx
2
3import React from 'react'
4
5const Index = () => {
6 return <div>Hello, World!</div>
7}
8
9export default index
After creating these pages if you run npm run dev next will warn you that you don't have typescript or the right types installed. To fix this run the following install script:
npm i --save-dev typescript @types/react
Now when you start the dev environment you should get a blank Hello, World! page. Now we can set up the components of the app.

Setting up Authentication

When we set up the backend we created a Cognito userpool and client and connected our userpool to appsync. We're now going to use our client to get an authentication token that will work with AppSync, the flow should work something like this:

  1. User loads the website.
  2. The website checks to see if the user is logged in.
  3. If yes go to step 5.
  4. Direct user to login or signup.
  5. When user logged in ask Cognito for an authorization token to send with API requests.
  6. Cognito returns a token that can be used.

These steps are pretty straight forward but can be very tricky to do correctly. Fortunately there is a prebuilt library for Cognito authentication that we can use in the AWS Amplify package.

npm install --save-dev aws-amplify
Once the package is installed we can configure the Auth object to connect to our Cognito client, for this we need the ID of the user pool and the client which we had exported from our stack before. Let's save them for the time being and add them to the code as environment variables.
1// src/pages/_app.tsx
2
3import React, { useEffect } from "react";
4import { Auth } from "aws-amplify";
5
6import type { AppProps } from 'next/app'
7import "tailwindcss/tailwind.css";
8
9Auth.configure({
10 userPoolId: process.env.NEXT_PUBLIC_USERPOOL_ID,
11 userPoolWebClientId: process.env.NEXT_PUBLIC_CLIENT_ID,
12 region: process.env.NEXT_PUBLIC_REGION,
13});
14
15function App({ Component, pageProps }: AppProps) {
16 return (
17 <Component {...pageProps} />
18 );
19}
20
21export default App;

Connecting Authenticator to React

To actually get an authentication token you need to build a login flow for the app. Now there are two ways this can be done; you can either use the prebuilt Amplify login screen or you can roll your own login. I've decided to build my own login flow which I made for another project. If you want to see the relevent pages they're avaliable in the repo.
src/pages/login.tsx
src/pages/signup.tsx
src/pages/confirm_signup.tsx

To make sure that the page shown to the user is always authenticated I've made a simple hook to return the authentication state to the page. Be aware this is a simple example of what should really be built into a React provider but it's fine for example purposes.

1// src/lib/authHook.ts
2
3import { Auth } from 'aws-amplify'
4import { Dispatch, SetStateAction, useEffect, useState } from 'react'
5
6export function useAuth(): [boolean, Dispatch<SetStateAction<boolean>>] {
7 const [isAuthenticated, setIsAuthenticated] = useState(false)
8
9 useEffect(() => {
10 ;(async () => {
11 try {
12 const session = await Auth.currentSession()
13 console.log(session)
14 if (!!session) setIsAuthenticated(true)
15 } catch (err) {
16 console.error(err)
17 }
18 })()
19 }, [])
20
21 return [isAuthenticated, setIsAuthenticated]
22}

Setting up Apollo

Now that our authentication is set up we can contact the AppSync API and run queries/mutations.

Apollo is a GraphQL implementation that can be used to generate and create an API similar to AppSync. For our use however, we're going to be using the open source client library that Apollo provides to execute queries against our endpoint. First thing we need to do is install Apollo.

npm install --save-dev @apollo/client
After Apollo is installed we need to configure it to work with a NextJS React app and the authentication method we've built. There is an example in the NextJS repo that explains how to connect Apollo. To connect with the Amplify auth library all we need to do is fetch the token which can be seen in the authLink context.
1// frontend/src/lib/apolloClient
2
3import { useMemo } from 'react'
4import {
5 ApolloClient,
6 createHttpLink,
7 from,
8 InMemoryCache,
9} from '@apollo/client'
10import { Auth } from 'aws-amplify'
11import { setContext } from '@apollo/client/link/context'
12import { onError } from '@apollo/client/link/error'
13import { Output } from '../queries/common'
14
15let apolloClient
16const httpLink = createHttpLink({
17 uri: process.env.NEXT_PUBLIC_API_URL,
18})
19
20const authLink = setContext(async (request, { headers }) => {
21 // get the authentication token from local storage if it exists
22 let token
23 try {
24 const session = await Auth.currentSession()
25 token = session.getAccessToken().getJwtToken()
26 } catch {
27 console.log('NO TOKEN!!!!')
28 }
29 return {
30 headers: {
31 ...headers,
32 Authorization: token ? token : '',
33 },
34 }
35})
36
37function createApolloClient() {
38 return new ApolloClient({
39 ssrMode: typeof window === 'undefined',
40 link: from([
41 onError((err) => {
42 console.log(err)
43 }),
44 authLink,
45 httpLink,
46 ]),
47 cache,
48
49 name: 'react-web-client',
50 version: '1.3',
51 queryDeduplication: false,
52 defaultOptions: {
53 watchQuery: {
54 fetchPolicy: 'cache-first',
55 },
56 },
57 })
58}
59
60export function initializeApollo(initialState = null) {
61 const _apolloClient = apolloClient ?? createApolloClient()
62
63 // If your page has Next.js data fetching methods that use Apollo Client, the initial state
64 // gets hydrated here
65 if (initialState) {
66 // Get existing cache, loaded during client side data fetching
67 const existingCache = _apolloClient.extract()
68 // Restore the cache using the data passed from getStaticProps/getServerSideProps
69 // combined with the existing cached data
70 _apolloClient.cache.restore({ ...existingCache, ...initialState })
71 }
72 // For SSG and SSR always create a new Apollo Client
73 if (typeof window === 'undefined') return _apolloClient
74 // Create the Apollo Client once in the client
75 if (!apolloClient) apolloClient = _apolloClient
76
77 return _apolloClient
78}
79
80export function useApollo(initialState) {
81 return useMemo(() => initializeApollo(initialState), [initialState])
82}
The apolloClient file creates a React hook that can be used by next as a provider - a type of React component that provides a context. A Context provides a way to pass data through the component tree without having to pass props down manually at every level 3. Now we can wrap our app in the <ApolloProvider> making our API avaliable to any React component in the tree.
1import React, { useEffect } from "react";
2import type { AppProps } from 'next/app'
3import { Auth } from "aws-amplify";
4import { ApolloProvider } from "@apollo/client";
5import { useApollo } from "../lib/apolloClient";
6import "tailwindcss/tailwind.css";
7
8Auth.configure({
9 userPoolId: process.env.NEXT_PUBLIC_USERPOOL_ID,
10 userPoolWebClientId: process.env.NEXT_PUBLIC_CLIENT_ID,
11 region: process.env.NEXT_PUBLIC_REGION,
12});
13
14function App({ Component, pageProps }: AppProps) {
15 const apolloClient = useApollo(pageProps.initialApolloState);
16
17 return (
18 <ApolloProvider client={apolloClient}>
19 <Component {...pageProps} />
20 </ApolloProvider>
21 );
22}
23
24export default App;

Now when we build the data components in our app we can automatically get data from our API.

Geting Data From the API to our Page

Now that we have our Authentication and Data layer built let's test them by displaying some content on our index.tsx page. We're going to make a simple 
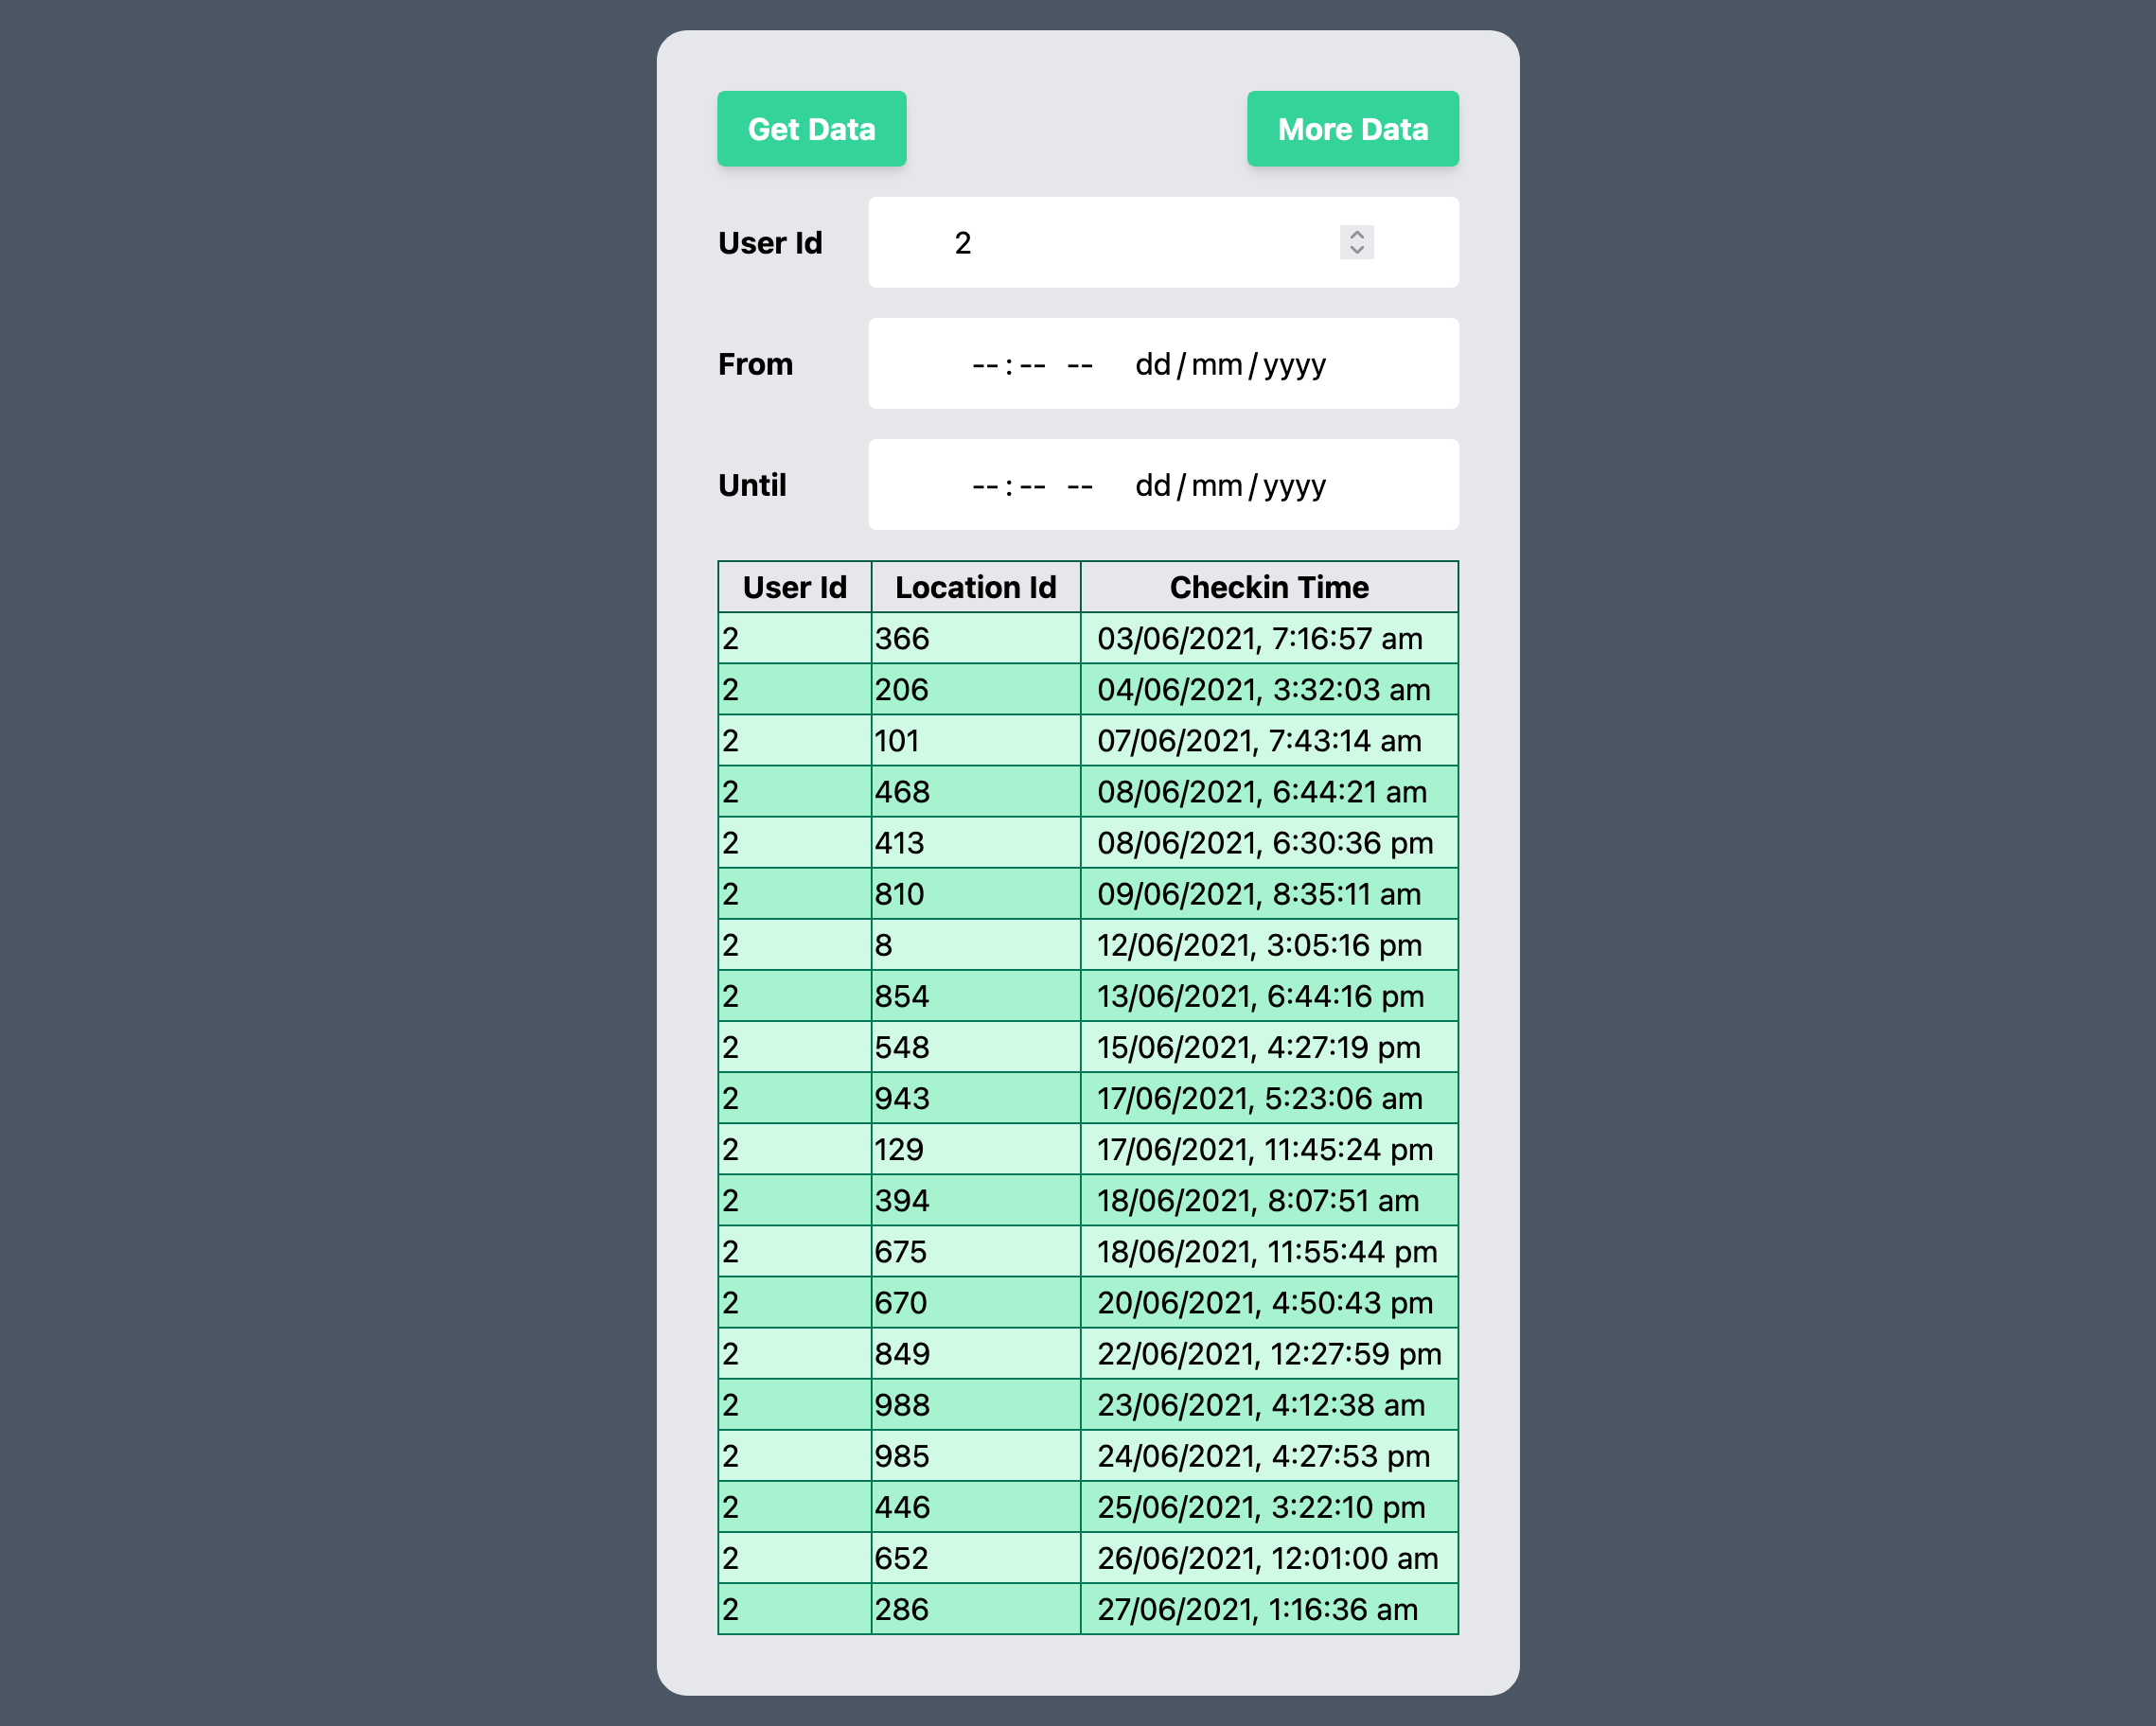
table display to show the data for a single user.
To start with we'll define the query we want to execute on the page, we'll call it get_user_location_history and save it in a file can we import from later.
1// src/lib/queries/get_user_location_history.ts
2
3import { gql } from '@apollo/client'
4
5export const GET_USER_LOCATION_HISTORY = gql`
6 query GetUserLocationHistory(
7 $user_id: String!
8 $nextToken: String
9 $from: AWSDateTime
10 $until: AWSDateTime
11 ) {
12 get_user_location_history(
13 user_id: $user_id
14 nextToken: $nextToken
15 from: $from
16 until: $until
17 ) {
18 items {
19 user_id
20 checkin_datetime
21 location_id
22 }
23 nextToken
24 }
25 }
26`
Then we can build a simple React page that can display the UserTable component if the user is authenticated.
1import React from 'react'
2import { GET_USER_LOCATION_HISTORY } from '../queries/get_user_location_history'
3import { TopBar } from '../components/TopBar'
4import { useAuth } from '../lib/authHook'
5import NoAuth from '../components/NoAuth'
6
7const Index = () => {
8 const [isAuth] = useAuth()
9 return (
10 <div className="min-h-screen dark:bg-gray-600">
11 <TopBar />
12 {isAuth ? <UserTable /> : <NoAuth />}
13 </div>
14 )
15}
The UserTable component is where all the buisness logic is found, we're going to use the useLazyQuery hook to get the data from our API when a user presses a button on the page.
1const UserTable = () => {
2 // const [userId, setUserId] = useState("1");
3 const [getUserLocationHistory, { loading, data, error, fetchMore }] =
4 useLazyQuery<{ get_user_location_history: Output }>(
5 GET_USER_LOCATION_HISTORY
6 )
7
8 const getMoreData = async () => {
9 await fetchMore({
10 variables: {
11 nextToken: data?.get_user_location_history?.nextToken || '',
12 },
13 })
14 }
15
16 const getData = (
17 userId: string,
18 fromDate: string,
19 fromTime: string,
20 untilDate: string,
21 untilTime: string
22 ) => {
23 const variables = {
24 user_id: userId,
25 }
26 if (fromDate && fromDate.length > 0) {
27 const from = new Date(
28 `${fromDate}${fromTime ? 'T' : ''}${fromTime}`
29 ).toJSON()
30 variables['from'] = from
31 }
32 if (untilDate && untilDate.length > 0) {
33 const until = new Date(
34 `${untilDate}${untilTime ? 'T' : ''}${untilTime}`
35 ).toJSON()
36 variables['until'] = until
37 }
38 getUserLocationHistory({ variables })
39 }
40
41 return (
42 // honestly I did a bad job at refactoring and I
43 // didn't want to put 500 more lines of JSX in this
44 // blog so you can look at the entire file at
45 // https://github.com/kochie/contact-tracing/blob/master/frontend/src/pages/index.tsx
46 )
47}

Now when you reload the page you should see something like this.

User Lookup Page
User Lookup Page

Building D3 components

So now that we have the data avaliable to React we can now do something with it. Since the user is on a site to view contact tracing data they probably want to see the data requested. There are lots of different ways to view this data but I'm going to explain how I made two of the layouts on the site in this article otherwise this post would never get finsihed. We're going to make a Radial tree and a Force-Directed tree.

There are lot's of ways to display data on a website, the earliest and most mundane system is to simply use tables like we did before. But using tables to display data can often obscure the more intricate connections and details in the data. Having custom elements that can display the data in different ways to emphasise and highlight specific facts and connections is a mcuh more user focused approach.

To help with this we're going to be using a library called D3 - a JavaScript library for manipulating documents based on data. D3 allows you to bind arbitrary data to the Document Object Model (DOM), and then apply data-driven transformations to a document. This approach is incredibly powerful, allowing developers to build anything within the scope of the DOM APIs.

Another advantage of D3 is the large set of utility modules that come included; while building the different components we're going to use a fair few of them.

Radial Tree

The first component we're going to make is a radial tree, this is a type of tree that has all the nodes sorted and aligned around a central root node. It's really useful for understanding the depth of a tree and how sparse or dense it is.

To start off we're going to make an empty NextJS page which will render an svg component.

1// frontend/src/pages/radial-tree.tsx
2
3import React, { useState, useRef } from 'react'
4import { linkRadial, select, stratify, tree } from 'd3'
5import { cloneDeep } from '@apollo/client/utilities'
6
7const RadialTree = () => {
8 const svgRef = useRef<SVGSVGElement>(null)
9 const tooltip = useRef<HTMLDivElement>(null)
10
11 const [width, setWidth] = useState(800)
12 const [height, setHeight] = useState(400)
13
14 const resize = () => {
15 setWidth(window.innerWidth)
16 // the topbar is 64px
17 setHeight(window.innerHeight - 64)
18 }
19
20 useEffect(() => {
21 window.addEventListener('resize', resize)
22 resize()
23
24 return () => {
25 window.removeEventListener('resize', resize)
26 }
27 }, [])
28
29 return (
30 <div>
31 <svg width={width} height={height} ref={svgRef} />
32 </div>
33 )
34}
35
36export default RadialTree
This should now render a blank page when you navigate to /radial-tree. Now it's time to add our connection to the AppSync API using Apollo. The Apollo client library for React manages both local and remote data with GraphQL.
To get the data from the server onto our page we're going to use the useLazyQuery React hook. This method will take the query string and variables and send these to the server.

First we'll define the query to execute. We can place this in a seperate file and export it into the component, this will be useful later as multiple components need to use the same query. Plus it's also tidier.

1// frontend/src/queries/trace_exposure_flat.ts
2
3import { gql } from '@apollo/client'
4
5export const TRACE_EXPOSURE_FLAT = gql`
6 query TraceExposureFlat(
7 $user_id: String!
8 $from: AWSDateTime
9 $until: AWSDateTime
10 ) {
11 trace_exposure_flat(user_id: $user_id, from: $from, until: $until) {
12 links {
13 source
14 target
15 location_id
16 time
17 }
18 nodes {
19 user_id
20 }
21 locations {
22 latitude
23 longitude
24 location_id
25 }
26 }
27 }
28`
I'm using a custom component I made called SearchBox which just creates a form and validates the inputs using Formik, you can read more about it in the repo, for the time being assume it's a form and the onSubmit function runs when the form is submitted.
1// frontend/src/pages/radial-tree.tsx
2
3import React, { useState, useRef } from 'react'
4import { useLazyQuery } from '@apollo/client'
5import { linkRadial, select, stratify, tree } from "d3";
6import { cloneDeep } from "@apollo/client/utilities";
7
8import { TRACE_EXPOSURE_FLAT } from '../queries/trace_exposure_flat'
9import SearchBox from "../components/SearchBox";
10
11const RadialTree = () => {
12 const [runQuery, { data, loading }] = useLazyQuery(TRACE_EXPOSURE_FLAT)
13 const svgRef = useRef<SVGSVGElement>(null)
14 const tooltip = useRef<HTMLDivElement>(null)
15
16 const [width, setWidth] = useState(800)
17 const [height, setHeight] = useState(400)
18
19 const resize = () => {
20 setWidth(window.innerWidth)
21 // the topbar is 64px
22 setHeight(window.innerHeight - 64)
23 }
24
25 useEffect(() => {
26 window.addEventListener('resize', resize)
27 resize()
28
29 return () => {
30 window.removeEventListener('resize', resize)
31 }
32 }, [])
33
34 const getData = (userId: string, from: string, until: string) => {
35 runQuery({
36 variables: {
37 user_id: userId,
38 from,
39 until,
40 },
41 });
42 };
43
44 return (
45 <div>
46 <SearchBox
47 loading={loading}
48 onSubmit={(userId, from, until) => getData(userId, from, until)}
49 />
50 <svg width={width} height={height} ref={svgRef} />
51 <div
52 ref={tooltip}
53 className={`absolute text-center p-1 bg-gray-400 text-white rounded pointer-events-none top-0`}
54 />
55 </div>
56 )
57}
58
59export default RadialTree

So now when the user selects a date and user id the API will be called through the React layer and return data to the view. Now all that needs to be done is display it.

There are a lot of moving parts in modern React applications, let's just pause for a moment and understand what we're doing and what the tools and frameworks we're using are designed for.

First, React is a library for building user interfaces. In the traditional MVC design pattern, React is the controller component, it's only job is to accept inputs and convert commands for the model or view4.

Apollo is a framework for data and state management, it's designed to fetch data, keep it in sync with the server and relay changes, it's the Model in the MVC pattern.

The final part is the view, we have a list of data that needs to be displayed to the user after they make a query, as eluded before to display the data we're going to be using D3 which is a JavaScript library for creating interactive visualizations in the browser. It's essentially a way of generating shapes and charts using svg components and html cavases. But the way it does this is amazing, there are so many tools and helper functions to build scales, shapes, charts, lines, and colours that you can pretty much create anything you can think of.

The advantage to D3 is the ability to create anything, the disadvantage is you have the ability to create anything, there are no prebuilt components - you need to know what you want to make.

To begin with, we're going to create another React hook that is dependent on the size of the window, and the data. The hook is going to create an svg selection using D3 that we can use to manipluate and edit the contents of the svg page.

1useEffect(() => {
2 if (!data) return
3 if (!svgRef.current) return
4 const svg = select(svgRef.current)
5 .attr('width', width)
6 .attr('height', height)
7 .append('g')
8 .attr('transform', `translate(${width}/2, ${height}/2)`)
9
10 return () => {
11 svg.selectAll('*').remove()
12 }
13}, [width, height, data])
So now that we've got a selectable svg element we can put our data into it and produce our visualisation. To do this we need to build a data structure that d3 understands and can parse to populate the svg nodes that it will create. There are a few components that we need to create to do this. The first thing that we need to do is clone the data recieved from apollo, this is because apollo data is not extensible5. We're also going to use the stratify constructor to create an operator to parse our API data into a d3 hierarchy, which is just a predefined data structure that d3 tree functions can understand. Finally we need to create a method that will create a tree from our data, the tree builder is exactly what we need.

Combining all of these constructor elements together and adding them to our hook gives the following code.

1useEffect(() => {
2 if (!data) return
3 if (!svgRef.current) return
4
5 const svg = select(svgRef.current)
6 .attr('width', width)
7 .attr('height', height)
8 .append('g')
9 .attr('transform', `translate(${width}/2, ${height}/2)`)
10
11 const graph: Graph = cloneDeep(data.trace_exposure_flat)
12 const strat = stratify<Link>()
13 .id((d) => d.target)
14 .parentId((d) => d.source)
15
16 const rootUser = graph.nodes[0]
17 const treeBuilder = tree<Link>()
18 .size([2 * Math.PI, Math.min(height, width) / 2 - 10])
19 .separation((a, b) => (a.parent == b.parent ? 1 : 2) / a.depth);
20
21 const s = strat([
22 { source: "", target: rootUser.user_id, location_id: "", time: "" },
23 ...graph.links,
24 ]);
25 const root = treeBuilder(s);
26
27 return () => {
28 svg.selectAll('*').remove()
29 }
30}, [width, height, data])

Great, so now we have the methods and structures in place to add data to the page, we're almost there. The last thing that needs to be done is to build the tree visually using svg elements. In a tree there are two seperate sections - verticies, and edges.

Using the d3 select tool we can create a group of svg path elements to represent the tree edges, the co-ordinates in the canvas are calculated using the tree builder so we only need to call the links method to pull the data for each element.
The verticies can be created in a similar fashion by building circle svg elements and calling the descendants method to retrieve all the vertex data.

The entire svg generation can be seen in the below snippet, there is some code that explains how the tree is wrapped into a circle as well.

1useEffect(() => {
2 if (!data) return
3 if (!svgRef.current) return
4
5 const svg = select(svgRef.current)
6 .attr('width', width)
7 .attr('height', height)
8 .append('g')
9 .attr('transform', `translate(${width}/2, ${height}/2)`)
10
11 const graph: Graph = cloneDeep(data.trace_exposure_flat)
12 const strat = stratify<Link>()
13 .id((d) => d.target)
14 .parentId((d) => d.source)
15
16 const rootUser = graph.nodes[0]
17 const treeBuilder = tree<Link>()
18 .size([2 * Math.PI, Math.min(height, width) / 2 - 10])
19 .separation((a, b) => (a.parent == b.parent ? 1 : 2) / a.depth);
20
21 const s = strat([
22 { source: "", target: rootUser.user_id, location_id: "", time: "" },
23 ...graph.links,
24 ]);
25 const root = treeBuilder(s);
26
27 svg
28 .append("g")
29 .attr("fill", "none")
30 .attr("stroke", "#555")
31 .attr("stroke-opacity", 0.4)
32 .attr("stroke-width", 1.5)
33 .selectAll("path")
34 .data(root.links())
35 .join("path")
36 .attr(
37 "d",
38 linkRadial()
39 .angle((d) => d.x)
40 .radius((d) => d.y)
41 )
42
43 svg
44 .append("g")
45 .selectAll("circle")
46 .data(root.descendants())
47 .join("circle")
48 .attr(
49 "transform",
50 (d) => `rotate(${(d.x * 180) / Math.PI - 90}) translate(${d.y},0)`
51 )
52 .attr("fill", (d) => (d.children ? "#555" : "#999"))
53 .attr("r", 2.5)
54
55 return () => {
56 svg.selectAll('*').remove()
57 }
58}, [width, height, data])

After adding all these components if you refresh the page you should see something like the tree below.

A radial ordered tree made with D3

If everything is working you can now generate a tree that shows the contacts and locations exposed to a person. But it's pretty hard to gleam any usable information from this tree at the moment. We can fix this by adding some contextual data using event listeners and add vertex and edge information to the tree when a particular element is hovered over.

1useEffect(() => {
2 if (!data) return
3 if (!svgRef.current) return
4 if (!tooltip.current) return;
5
6 const svg = select(svgRef.current)
7 .attr('width', width)
8 .attr('height', height)
9 .append('g')
10 .attr('transform', `translate(${width}/2, ${height}/2)`)
11
12 const graph: Graph = cloneDeep(data.trace_exposure_flat)
13 const strat = stratify<Link>()
14 .id((d) => d.target)
15 .parentId((d) => d.source)
16
17 const rootUser = graph.nodes[0]
18 const treeBuilder = tree<Link>()
19 .size([2 * Math.PI, Math.min(height, width) / 2 - 10])
20 .separation((a, b) => (a.parent == b.parent ? 1 : 2) / a.depth);
21
22 const s = strat([
23 { source: "", target: rootUser.user_id, location_id: "", time: "" },
24 ...graph.links,
25 ]);
26 const root = treeBuilder(s);
27
28 const div = select(tooltip.current)
29 .style("opacity", 0);
30
31 svg
32 .append("g")
33 .attr("fill", "none")
34 .attr("stroke", "#555")
35 .attr("stroke-opacity", 0.4)
36 .attr("stroke-width", 1.5)
37 .selectAll("path")
38 .data(root.links())
39 .join("path")
40 .attr(
41 "d",
42 linkRadial()
43 .angle((d) => d.x)
44 .radius((d) => d.y)
45 )
46 .on("mouseover", function (d, i) {
47 select(this).transition().duration(100).attr("stroke-width", 3);
48 div.transition().duration(100).style("opacity", 1);
49 div
50 .html(() => {
51 const x = graph.links.find(
52 (link) =>
53 link.source === i.source.id && link.target === i.target.id
54 );
55
56 return (
57 "<div>Location ID: " +
58 x.location_id +
59 "</div><div>DateTime: " +
60 new Date(x.time).toLocaleString("en-AU", {
61 timeZone: "Australia/Melbourne",
62 }) +
63 "</div>"
64 );
65 })
66 .style("left", d.pageX + 10 + "px")
67 .style("top", d.pageY - 15 + "px");
68 })
69 .on("mouseout", function (d, i) {
70 select(this).transition().duration(200).attr("stroke-width", 1.5);
71 div.transition().duration(200).style("opacity", 0);
72 });
73
74 svg
75 .append("g")
76 .selectAll("circle")
77 .data(root.descendants())
78 .join("circle")
79 .attr(
80 "transform",
81 (d) => `rotate(${(d.x * 180) / Math.PI - 90}) translate(${d.y},0)`
82 )
83 .attr("fill", (d) => (d.children ? "#555" : "#999"))
84 .attr("r", 2.5)
85 .on("mouseover", function (d, i) {
86 select(this).transition().duration(100).attr("r", 5);
87 div.transition().duration(100).style("opacity", 1);
88 div
89 .html("User ID: " + i.id)
90 .style("left", d.pageX + 10 + "px")
91 .style("top", d.pageY - 15 + "px");
92 })
93 .on("mouseout", function (d, i) {
94 select(this).transition().duration(200).attr("r", 2.5);
95 div.transition().duration(200).style("opacity", 0);
96 });
97
98 return () => {
99 svg.selectAll('*').remove()
100 }
101}, [width, height, data])

Now when you hover over a part of the tree you should see a handy tooltip.

Hover effect
Hover effect

Force-Directed Tree

Another visual we can create is the force-directed tree - a visualization that uses a numerical integrator for simulating forces. This visualisation is really good at showing clusters and relative sizes of tree groups. The setup and implementation is identical to the radial tree we created before, the only difference is the D3 render hook. In it we're going to create a simulation object and link it to our tree structure.

1useEffect(() => {
2 if (!data) return
3 if (!svgRef.current) return
4
5 const graph: Graph = cloneDeep(data.trace_exposure_flat)
6
7 const strat = stratify<Link>()
8 .id((d) => d.target)
9 .parentId((d) => d.source)
10
11 const rootUser = graph.nodes[0]
12
13 const s = strat([
14 { source: '', target: rootUser.user_id, location_id: '', time: '' },
15 ...graph.links,
16 ])
17
18 const svg = select(svgRef.current)
19 .attr('width', width)
20 .attr('height', height)
21 .attr('viewBox', [-width / 2, -height / 2, width, height].join(' '))
22 .append('g')
23
24 const dragSimulation = (simulation) => {
25 function dragstarted(event, d) {
26 if (!event.active) simulation.alphaTarget(0.3).restart()
27 d.fx = d.x
28 d.fy = d.y
29 }
30
31 function dragged(event, d) {
32 d.fx = event.x
33 d.fy = event.y
34 }
35
36 function dragended(event, d) {
37 if (!event.active) simulation.alphaTarget(0)
38 d.fx = null
39 d.fy = null
40 }
41
42 return drag()
43 .on('start', dragstarted)
44 .on('drag', dragged)
45 .on('end', dragended)
46 }
47
48 const root = hierarchy(s)
49 const links = root.links()
50 const nodes = root.descendants()
51
52 const simulation = forceSimulation(nodes)
53 .force(
54 'link',
55 forceLink(links)
56 .id((d) => d.id)
57 .distance(0)
58 .strength(1)
59 )
60 .force('charge', forceManyBody().strength(-60))
61 .force('x', forceX())
62 .force('y', forceY())
63
64 const locationMax = max(graph.links.map((l) => parseInt(l.location_id)))
65
66 const link = svg
67 .append('g')
68 .attr('stroke', '#999')
69 .attr('stroke-opacity', 0.7)
70 .attr('stroke-width', '2')
71 .selectAll('line')
72 .data(links)
73 .join('line')
74 .attr('stroke', (d) => {
75 const line = graph.links.find(
76 (l) => l.source === d.source.data.id && l.target === d.target.data.id
77 )
78 return interpolateSinebow(parseInt(line.location_id) / locationMax)
79 })
80
81 const node = svg
82 .append('g')
83 .attr('fill', '#fff')
84 .attr('stroke', '#000')
85 .attr('stroke-width', 1.5)
86 .selectAll('circle')
87 .data(nodes)
88 .join('circle')
89 .attr('fill', (d) => (d.children ? null : '#000'))
90 .attr('stroke', (d) => (d.children ? null : '#fff'))
91 .attr('r', 4.5)
92 .call(dragSimulation(simulation))
93
94 node.append('title').text((d) => 'UserID: ' + d.data.id)
95
96 simulation.on('tick', () => {
97 link
98 .attr('x1', (d) => d.source.x)
99 .attr('y1', (d) => d.source.y)
100 .attr('x2', (d) => d.target.x)
101 .attr('y2', (d) => d.target.y)
102
103 node.attr('cx', (d) => d.x).attr('cy', (d) => d.y)
104 })
105
106 return () => {
107 svg.selectAll('*').remove()
108 }
109}, [data, height, width])
If you create a new file and copy the code from radial-tree.tsx and replace the hook with the code seen above you shoud see something like this.
A force-directed tree made with D3

Mapping using MapBox

Visual components are great but sometimes you need to display data relative to the real world. Maps are the best way of displaying geographical data. In this component I'll show you how to overlay geographical data on a map.

We're going to make another page called map.tsx which will be our base. To make the map we're going to use a library called mapbox. Mapbox is a great service that provides high resolution maps with their SDK.

To set up the map we're going to import the JavaScript SDK and the map styles. We're also going to create a div which will be the map container.

1// src/pages/map.tsx
2
3import React, { useCallback, useEffect, useRef, useState } from 'react'
4import { TopBar } from '../components/TopBar'
5import mapbox, { Popup } from 'mapbox-gl'
6import { useLazyQuery } from '@apollo/client'
7import { TRACE_EXPOSURE_FLAT } from '../queries/trace_exposure_flat'
8import { cloneDeep } from '@apollo/client/utilities'
9import SearchBox from '../components/SearchBox'
10
11import 'mapbox-gl/dist/mapbox-gl.css'
12
13interface Link {
14 location_id: string
15 time: string
16 source: string
17 target: string
18 latitude: string
19 longitude: string
20}
21
22interface Graph {
23 links: Link[]
24 locations: {
25 location_id: string
26 latitude: string
27 longitude: string
28 }[]
29 nodes: {
30 user_id: string
31 }[]
32}
33
34const Map = () => {
35 const [runQuery, { data, loading }] = useLazyQuery(TRACE_EXPOSURE_FLAT)
36 const [map, setMap] = useState<mapbox.Map>()
37 const [markers, setMarkers] = useState<mapbox.Marker[]>([])
38
39 return (
40 <>
41 <TopBar />
42 <SearchBox
43 loading={loading}
44 onSubmit={(userId, from, until) =>
45 runQuery({ variables: { user_id: userId, from, until } })
46 }
47 />
48 <div
49 ref={ref}
50 className="w-screen"
51 style={{ height: 'calc(100vh - 64px)' }}
52 />
53 </>
54 )
55}
56
57export default Map
After creating the page we need to initialise the map inside the container. We're going to use the useCallback hook to make a custom reference for our map 
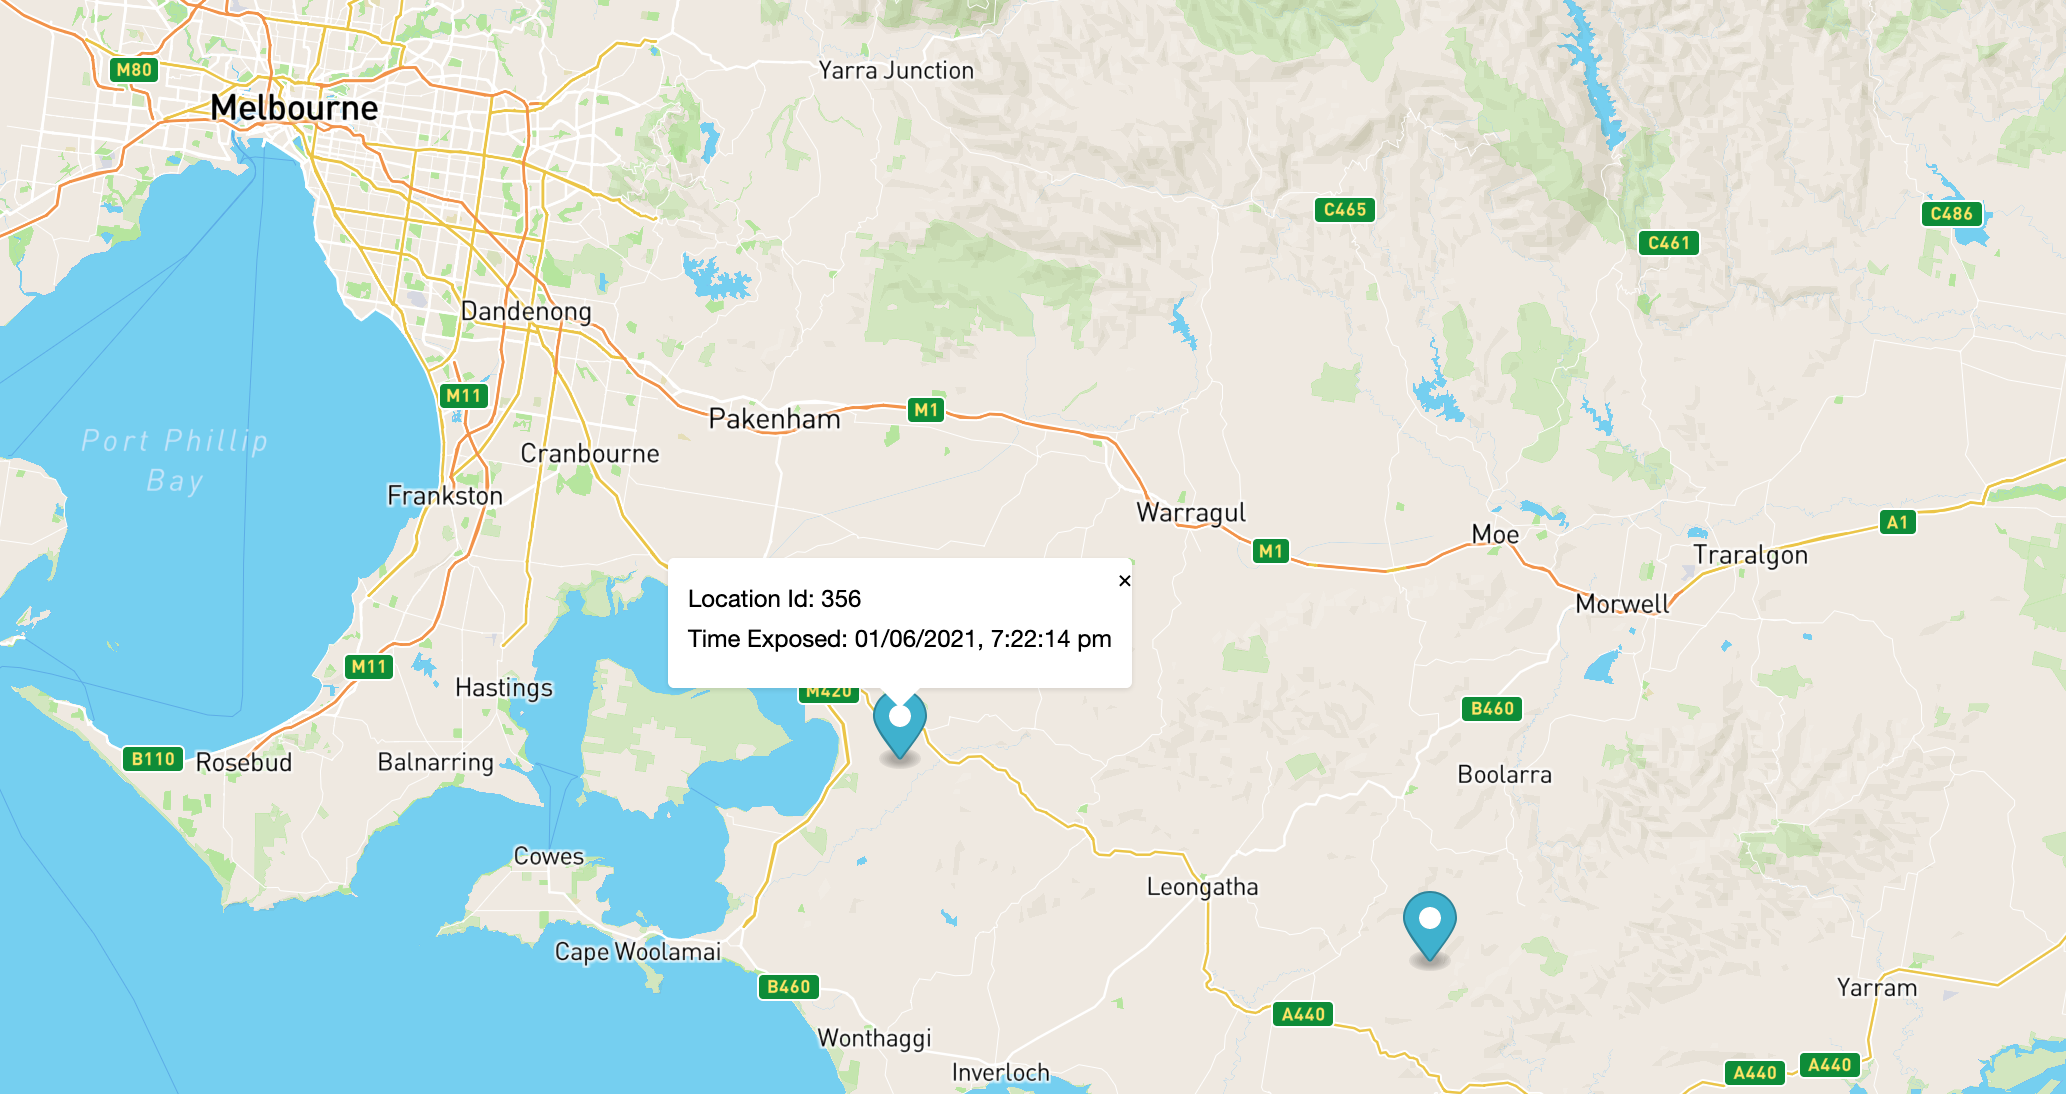
that can be updated when the page loads the SDK.
1const ref = useCallback((node: HTMLDivElement) => {
2 if (node === null) return
3 const m = new mapbox.Map({
4 container: node, // container id
5 style: 'mapbox://styles/mapbox/streets-v11', // style URL
6 center: [144.96332, -37.814], // starting position [lng, lat]
7 zoom: 8, // starting zoom
8 accessToken: process.env.NEXT_PUBLIC_MAPBOX_TOKEN,
9 })
10
11 m.addControl(
12 new mapbox.GeolocateControl({
13 positionOptions: {
14 enableHighAccuracy: true,
15 },
16 trackUserLocation: true,
17 })
18 )
19
20 setMap(m)
21
22 return () => {
23 m.remove()
24 }
25}, [])

When the map is initialised we can being displaying data using a react hook similar to how we displayed data in the D# components.

1useEffect(() => {
2 if (!data?.trace_exposure_flat) return
3 if (!map) return
4 const graph: Graph = cloneDeep(data.trace_exposure_flat)
5
6 const m = graph.locations.map((location) => {
7 const exposeTime =
8 graph.links.find((link) => link.location_id === location.location_id)
9 ?.time || ''
10
11 // This only happens if the location was exposed but no new people were checkin in.
12 // For this example we'll leave blank
13 if (!exposeTime) return
14
15 return new mapbox.Marker()
16 .setPopup(
17 new Popup({ offset: 25 }).setHTML(`<div>
18 Location Id: ${location.location_id}
19 </div><div>
20 Time Exposed: ${
21 exposeTime ? new Date(exposeTime).toLocaleString() : 'Not Exposed'
22 }
23 </div>`)
24 )
25 .setLngLat([
26 parseFloat(location.longitude),
27 parseFloat(location.latitude),
28 ])
29 .addTo(map)
30 })
31
32 setMarkers(m)
33 return () => {
34 markers.forEach((m) => (m ? m.remove() : null))
35 }
36}, [data, map])

And there you have it! Now the map can load data and then display it on a page. If you refresh the page you should see something like this map below.

Mapbox marker example

Final Thoughts

If you've made it this far, well done! This article turned out a lot longer than I originally planned. I thought about splitting it into multiple articles but I think the flow of a single document is easier to understand and consume.

This project was actually a lot more complicated then I first assumed it would be, the fact that both Dynamo Dax and XRay didn't have support for Golangs aws-sdk-v2 really slowed down my development. The D3 charts also took a long time to make, but once they started to work it was okay to iterate and improve.
If you've found this article useful or can't understand a word I've said you can yell at me on Twitter, my handle is @kochie.

Footnotes

  1. So there are multiple imports for CDK that you'll need depending on which resources you define. The main CDK import aws-cdk-lib contains all the modules for individual services, to import specific services the best way is to alias the import like so aws_cognito as cognito.
  2. Maybe another project?
  3. The definition provided by the React docs.
  4. Okay so not quite. In the documentation it says "React isn’t an MVC framework. React is a library for building composable user interfaces." But in context to how React is used in this application it's essentially the controller.
  5. For more information about this little quirk of JavaScript take a look at the docs on MDN, actually since these components aren't modifying the data this clone isn't really needed, but it's still good practice to treat API data as immutable objects.
Robert Koch Avatar

👋 I'm Robert, a Software Engineer from Melbourne, Australia. I write about a bunch of different topics including technology, science, business, and maths.

Like what you see?

Find out when I sporadically scream into the void...

Privacy respected. Unsubscribe at anytime.